

Every bullet hole on a target is an unvarnished physical record of your neuromuscular execution. When a shot lands cleanly in the 10-ring, your skeletal platform, eye focus, and finger mechanics acted in harmonious precision. But when a flyer tears through the outer 7-ring at 7 o’clock or punches high-right at 1 o’clock, the target is not displaying bad luck—it is communicating a specific, diagnosable biomechanical error. At InRecoil, we believe that self-coaching begins with learning how to read the language of your target. Today, we are releasing the official InRecoil Shooter Fault Diagnostic Manual as a free, high-resolution downloadable PDF reference guide.
[box]
Download the Official InRecoil Shooter Fault Diagnostic Manual
Keep this comprehensive, 2-page printable coaching reference card in your range bag or on your tablet. It features our complete vector Pistol Target Correction Wheel, detailed biomechanical root-cause analyses, target impact sectors, and proven corrective drills for all 14 classical shooting errors.
Download Free Diagnostic Guide (PDF) Explore Technical Training Hub
[/box]
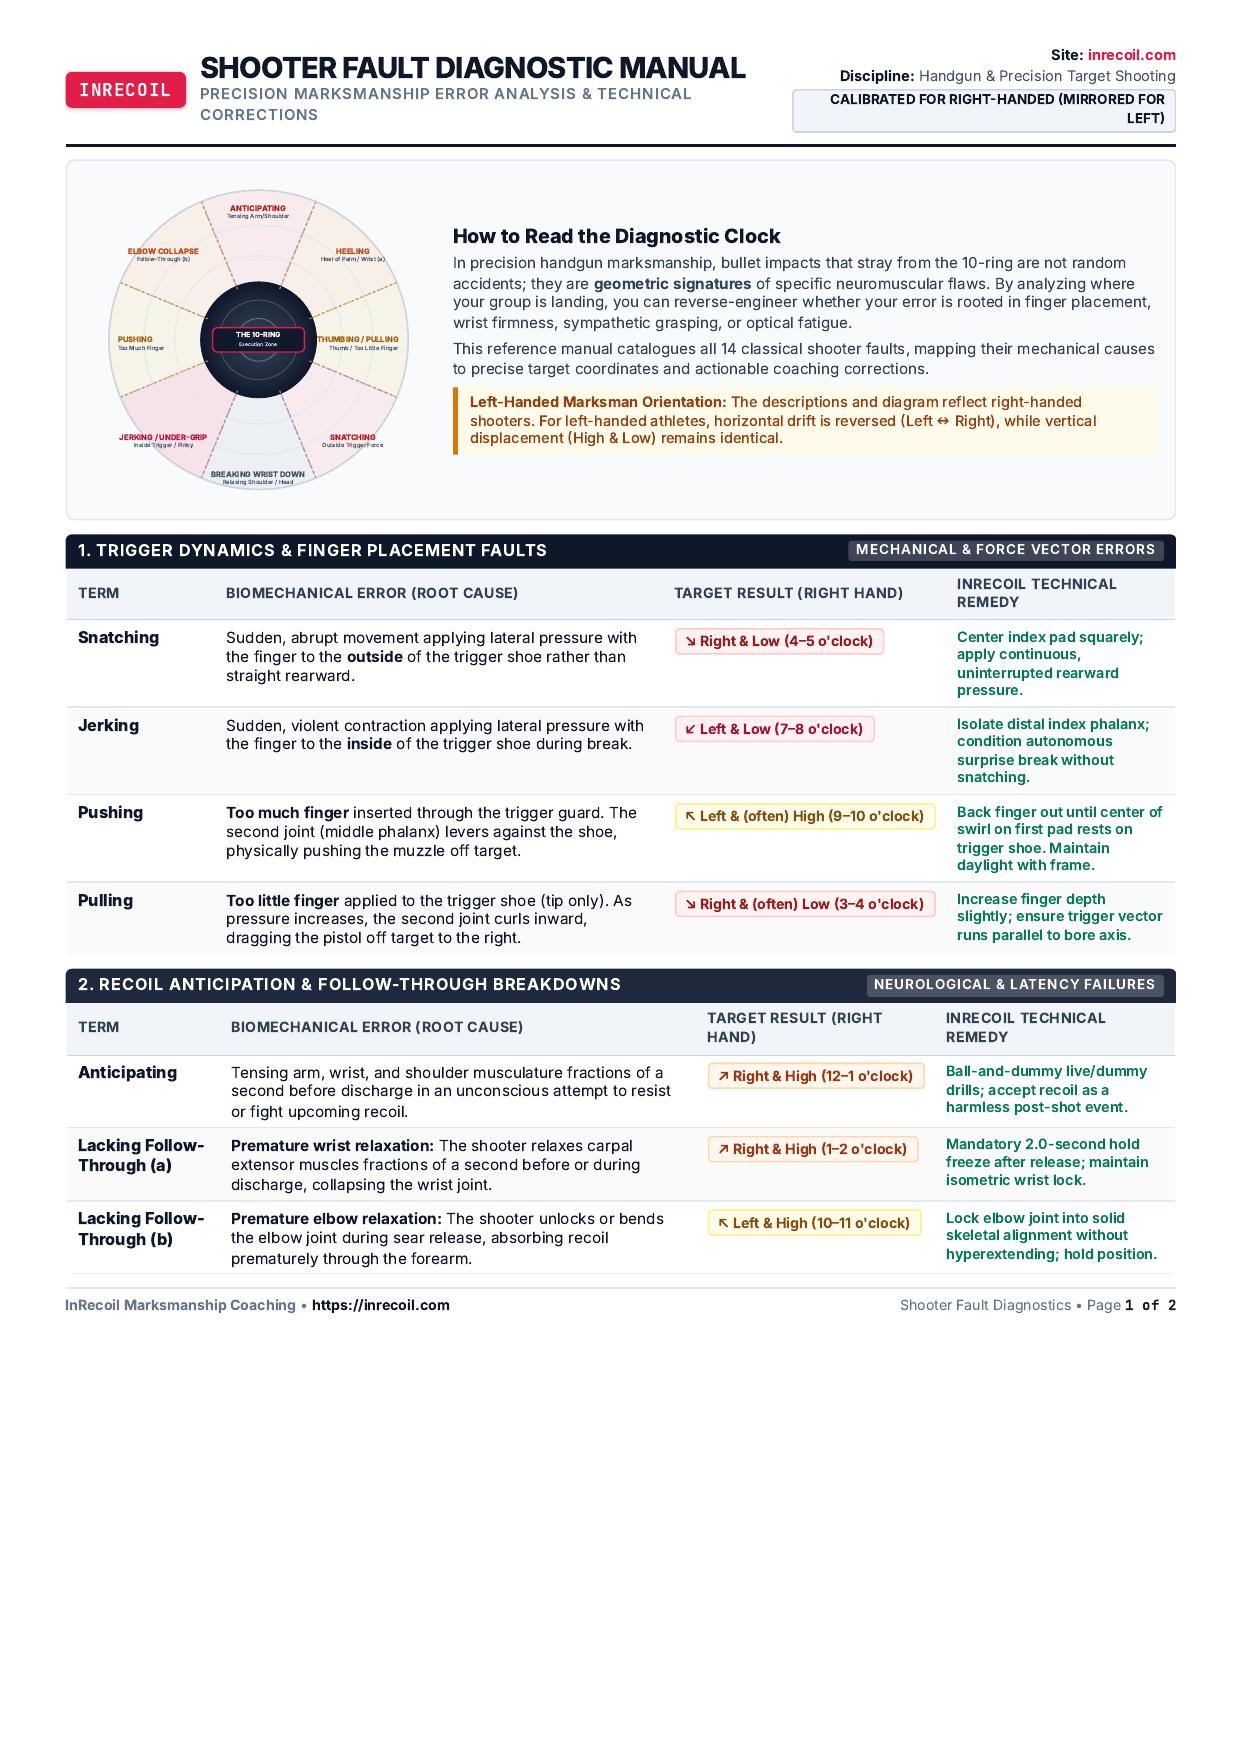
Figure 1: The InRecoil Shooter Fault Diagnostic Manual (Vector Target Wheel & Mechanical Classification Matrix).
The Origins and Evolution of the Pistol Diagnostic Wheel
The concept of mapping target clock sectors to mechanical shooting flaws has a storied pedigree in international marksmanship. Pioneered in military marksmanship units (including the US Army Marksmanship Unit and international Olympic coaching academies), the “Shooter’s Wheel” was designed to give instructors a rapid diagnostic shorthand. However, traditional legacy charts suffered from major limitations: they were often photocopied monochrome sheets with vague descriptions, lacked technical remedies, omitted the crucial difference between angular and parallel optical errors, and frequently failed to explain why specific hand muscles pull shots in certain vectors.
Our updated manual recreates and modernizes this foundational tool, integrating contemporary sports science, electromyographic muscle data, and optoelectronic SCATT trace analytics. Whether you shoot 10m Air Pistol, 25m Standard Pistol, 50m Free Pistol, or bullseye disciplines, understanding these 14 faults will save you hundreds of wasted rounds and accelerate your progress toward the podium.
How to Read the Target Diagnostic Clock
Before analyzing individual errors, it is essential to understand the geometry of handgun displacement. Because the firearm is held at the end of an extended, single-arm lever, microscopic rotational torques at the wrist or trigger shoe translate into substantial linear displacements at 25 or 50 meters:
Top & High Sectors (11:00 to 1:30)
- 12:00 High: Recoil anticipation; tensing shoulder/neck muscles upward immediately prior to ignition.
- 1:30 High-Right: Heeling (excessive palm heel pressure) and premature wrist extensor relaxation per our Follow-Through Protocols.
- 10:30 High-Left: Elbow relaxation and premature collapse of the forearm strut.
Bottom & Low Sectors (4:30 to 7:30)
- 4:30 Low-Right: Snatching the trigger shoe (applying outside lateral torque) or downward thumb clamping.
- 6:00 Low: Breaking the wrist downward or dropping the head to scope the target.
- 7:30 Low-Left: The classic beginner error—Jerking the inside of the trigger, fingertipping, or under-gripping per our Grip Guidelines.
The Left-Handed Marksman Orientation Rule: All clock-face descriptions and diagrams reflect right-handed athletes. For left-handed shooters, the physical mechanics operate in reverse across the vertical axis: horizontal displacements invert (Left becomes Right, Right becomes Left), while vertical displacements (High and Low) remain identical. For example, a left-handed shooter who jerks the trigger will throw their shot to the low-right (4 to 5 o’clock).
Category 1: Trigger Dynamics & Finger Placement Faults
The trigger finger is the only digit on your shooting hand that should move during shot delivery. When this isolation breaks down, mechanical torque pushes or pulls the muzzle off alignment:
1. Snatching (Low-Right / 4–5 O’Clock)
The Mechanism: The shooter applies sudden, hurried pressure by contacting the outside edge of the trigger shoe. Instead of pressing straight back parallel to the bore axis, the finger pulls diagonally, twisting the muzzle low-right at sear release.
The Fix: Reposition the index finger so the center pad of the distal phalanx rests squarely across the shoe per our Trigger Control Guide. Condition uninterrupted, progressive trigger pressure.
2. Jerking (Low-Left / 7–8 O’Clock)
The Mechanism: The most common error in handgun shooting. The athlete attempts to “catch the 10-ring” as the sights drift across center, slapping or jerking the inside edge of the trigger. This contracts the flexor digitorum muscles violently, wrenching the barrel downward and to the left.
The Fix: Adopt area aiming! Accept your natural Minimum Arc of Movement, focus 100% on the front sight, and allow the shot to break as a subconscious surprise.
3. Pushing (Left & Often High / 9–10 O’Clock)
The Mechanism: Too much finger is inserted through the trigger guard. The crease of the first joint or the middle phalanx levers against the side of the shoe, physically pushing the handgun outward to the left.
The Fix: Back the finger out. Verify that there is visible daylight between the handgun’s frame and the side of your index finger.
4. Pulling (Right & Often Low / 3–4 O’Clock)
The Mechanism: Too little finger contacts the trigger shoe (tip or fingernail edge only). As trigger weight increases, the finger curls inward like a claw, dragging the pistol frame toward the right.
The Fix: Deepen finger placement until the natural center swirl of the first pad makes full, flat contact with the trigger face.
Category 2: Recoil Anticipation & Follow-Through Breakdowns
A firearm discharges in less than 10 milliseconds, but human conscious reaction requires 150 to 200 milliseconds. If you attempt to relax “as the gun goes off,” your brain actually sent the command to quit before the bullet left the barrel:
Anticipating (High-Right)
Tensing the deltoid, forearm, and pectorals immediately prior to sear release to fight recoil. Drives shots high-right. Overcome this using the live/dummy round test.
Lacking Follow-Through (a)
Relaxing the wrist extensor muscles prematurely during ignition. The wrist collapses upward or sideways, throwing the projectile into the 1 to 2 o’clock ring.
Lacking Follow-Through (b)
Unlocking or softening the elbow joint at the moment of break. The forearm absorbs recoil prematurely, lifting shots into the high-left 10 to 11 o’clock zone.
To eliminate follow-through failures, enforce the mandatory 2.0-Second Hold Freeze Drill detailed in our comprehensive guide to Follow-Through & Shot Calling. Keep the trigger pinned to the rear and maintain front sight focus until the firearm settles completely back into your aiming area.
Category 3: Grip Pressure Dynamics & Hand Torque
Your grip is an anatomical vise. If pressure is distributed unevenly, recoil dynamics become erratic and the front sight shifts under pressure:
| Grip Fault | Biomechanical Root Cause | Target Displacement | Corrective Action |
|---|---|---|---|
| Under-Gripping | Holding with <30% tension; gun slips toward open hand | Low-Left (7–8 o’clock) | Maintain steady 50% “firm handshake” pressure per Grip Rules |
| Heeling | Crushing with palm heel; pushes lower frame forward | High-Right (1–2 o’clock) | Lower palm shelf; relieve pressure on lower palm eminence |
| Thumbing | Clamping thumb inward against frame or shelf | Low-Right (3–5 o’clock) | Rest thumb passively forward; zero lateral thumb pressure |
| Fingertipping | Tightening pinky finger; flexor digiti minimi pulls wrist down | Low-Left (6–7 o’clock) | Keep pinky completely relaxed; bear weight on middle finger |
Category 4: Optical Alignment: Parallel Error vs. Angular Error
One of the most critical sections of our diagnostic manual is the distinction between Parallel Error and Angular Error. Understanding this optical math will instantly cure target panic:
✓ Parallel Error (Area Aiming Acceptable)
Definition: The front sight is perfectly centered and level inside the rear notch, but the entire firearm wobbles 3mm to the left of the bullseye center.
Result on Target: The bullet lands exactly 3mm to the left of center—scoring a clean 10.2! Parallel displacement causes minimal score loss. Never abort a shot because of parallel wobble!
⚠ Angular Error (Catastrophic to Score)
Definition: The sights are pointing at the dead center of the 10-ring, but the front sight blade is tilted or hugging one side of the rear notch by just 1.0mm.
Result on Target: Over a 25m or 50m distance, that 1mm angular cant diverges into a massive 150mm to 300mm miss! Angular sight error destroys matches. Focus 100% on the front sight!
For a detailed breakdown of optical depth of field, light bars, and front-sight serration focus, study our foundational guide on Sighting with the Pistol.
Category 5: Temporal & Neuromuscular Fatigue (Overholding)
Holding a handgun steady is a race against human physiology. When you raise your arm and enter the natural respiratory pause, your performance curve follows a strict biological timeline:
- Seconds 1 to 3 (Settling Phase): Weapon enters the aiming area; cardiovascular pulse stabilizes.
- Seconds 4 to 7 (The Peak Window): Maximum neuromuscular stillness; peak retinal rhodopsin concentration; optimal contrast sensitivity. The shot must break here!
- Seconds 8 to 10 (Deterioration Phase): Lactic acid accumulates in the deltoid; blood oxygen saturation drops; retinal purple depletes, causing the front sight to blur.
- Beyond 10 Seconds (The Overholding Trap): The brain panics from hypoxia. The shooter, desperate to salvage the shot, violently snatches or jerks the trigger, producing a wild flyer.
The Golden Rule of Championship Marksmanship: The 8-Second Abort. If your shot does not break cleanly by second 7 or 8, ABORT THE SHOT. Lower the pistol to the bench, breathe deeply for 20 seconds, clear your visual purple, and restart your shot routine. Refusing to fire past 8 seconds separates champions from amateurs.
The 4 Cardinal Laws of Precision Shot Delivery
To inoculate your marksmanship against these 14 classical errors, build your shot routine around these four inviolable laws:
- Consistent Stance & Natural Point of Aim: Establish a relaxed, skeletal platform where the gun settles naturally on the target without muscular forcing per our Pistol Stance Analysis.
- Unbroken Front Sight Focus: Keep your dominant eye locked on the sharp top edge of the front sight post; allow the background bullseye to remain softly blurred.
- Straight-Back Trigger Isolation: Squeeze the trigger shoe smoothly, progressively, and straight rearward parallel to the bore, completely isolating the index finger from the grip.
- Focus on Process Delivery, Not Score Outcome: Concentrate exclusively on executing your mechanical routine (stance, breathing, sight, squeeze, follow-through)—never on shooting a “10”.
The InRecoil Training Remedy: How to Eliminate Faults
You cannot correct marksmanship errors simply by firing more live rounds at the range. Live ammunition introduces noise, recoil anticipation, and score anxiety. Instead, deploy the three core training modalities featured in our General Shooting Exercises (SH Series):
- Disciplined Dry-Firing: Perform 3 dry-fire repetitions for every live round fired. Dry firing allows you to watch the front sight blade with 100% clarity, verifying that the sear breaks without a microscopic twitch. Practice the empty brass casing balance drill!
- Wall-Holding Endurance Drills: Stand 2 meters from a blank white wall. Raise the handgun into position and hold for 35 to 45 seconds without firing. This builds rotator cuff capillary density and shrinks your competition holding arc.
- Optoelectronic SCATT Diagnostics: Connect a SCATT sensor to measure your Coordination Factor (C) and muzzle trace speed. High-level shooters use SCATT to diagnose whether errors are optical (sight wobble) or mechanical (finger snatching).
Download Your Free Copy & Elevate Your Marksmanship
Whether you are preparing for your first club competition or aiming for national team selection, having a quick-reference diagnostic guide on your bench is indispensable. Download the printable 2-page manual below, laminate it for your range bag, and share it with your fellow marksmen.
[box]
Get the InRecoil Shooter Fault Diagnostic Manual (PDF)
Official 2-page printable edition in vector PDF format. Calibrated for right-handed and left-handed target shooters across all handgun disciplines.
Download Free PDF Guide Return to Technical Basics
[/box]
Have questions about diagnosing your shot group or setting up your training microcycle? Connect with our coaching specialists on our About InRecoil page or submit an inquiry via our Contact Page.